The second webinar of the series «BIM Design: From Fundamentals to Practice»
(held on April 18, 2018 at 11:00 Moscow time)
The webinar plan:
- project template;
- definition of families, their categories, types, and instances;
- introduction to the component and family library;
- definition of type parameters and family instance;
- definition of general parameters.
720p full screen watching is recommended.
Webinar text. Page 1
Fast navigation by slides:
Approximate reading time: 41 minutes.

Software structure and basic concepts of Revit
Структура программы и основные понятия Revit - Software structure and basic concepts of Revit
ZANDZ.com, апрель 2018 - ZANDZ.com, April 2018
– Good afternoon, dear colleagues! We are glad to greet you at our today's webinar. Our webinar today is titled “Software Structure and Basic Concepts of Revit”. The speaker is Stanislav Vozchikov, a BIM modelling expert and a certified Autodesk Revit Professional specialist. The current webinar is the second event from the series titled “BIM Design: From Fundamentals to Practice”. It is excellent that the participants, first, were present in the previous webinar and, second, their major part includes new participants. In any case, I will tell you that the next webinar of this series will be held on May 24. The link to the webinar series will be sent to the chat. I will also tell you that we are planning to conduct the next webinar with professor Eduard Meerovich Bazelyan in the next few months. After final approval of the subject and date, the information will be published on our website. You can get information about our new events on the website and in our social media groups. We will also send the links to the chat. Join the social media groups or register at the website. Do not miss the relevant events. Here are some organizational aspects: the webinar today will take 60 minutes. We will answer the questions during the webinar and then additionally at the end of the webinar, if required. I will answer the most frequently asked question right away: the webinar record will be published on the website within several days after the webinar and the record processing. The link to the record will be sent by e-mail to all participants registered for the webinar. Please write your questions in the “Questions” tab that is located a little bit to the right from the chat. And when you write a question, indicate the slide or the speaker's phrase it relates to. I and Aleksey Korytko will moderate today's webinar. My name is Anatoly Rusanov. I urge you to be active, ask questions, and leave your comments in the chat. I have finished the introductory word and I give the turn to the speaker. Stanislav?
– Thank you. Now, let’s begin. Today, we will study the following subject: “Software Structure and Basic Concepts of Revit”. We had an introduction in the previous part describing what BIM is, what kind of technology it is, what processes are used. And today, we will directly study the tool for implementing this process. We will also have the introduction and get to know Revit, its operating principles and basic concepts. It is very important for understanding and working with the software. It is very important to understand its fundamentals, its foundation, so that to start working with it quicker.
– Yes, thank you, Anatoly. Hello to everyone, again! Today, we will have the introductory lecture titled “Introduction to BIM” and consider the following questions: What is BIM? What is it used for? Who can use it?
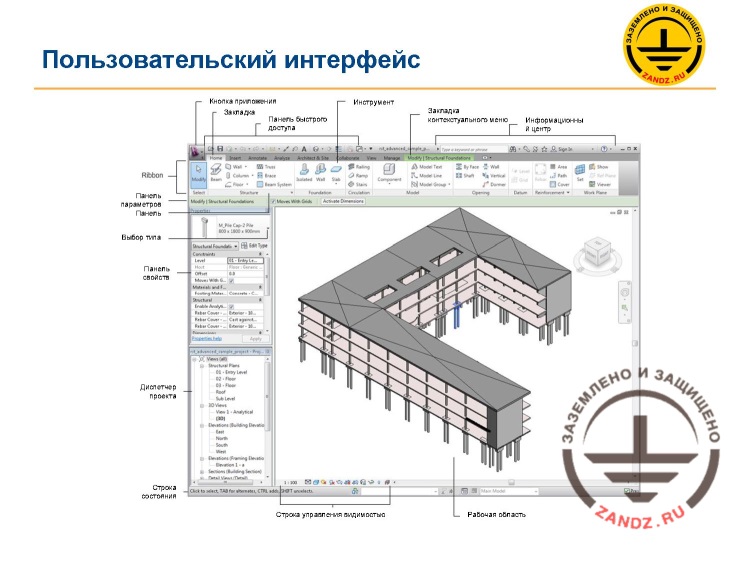
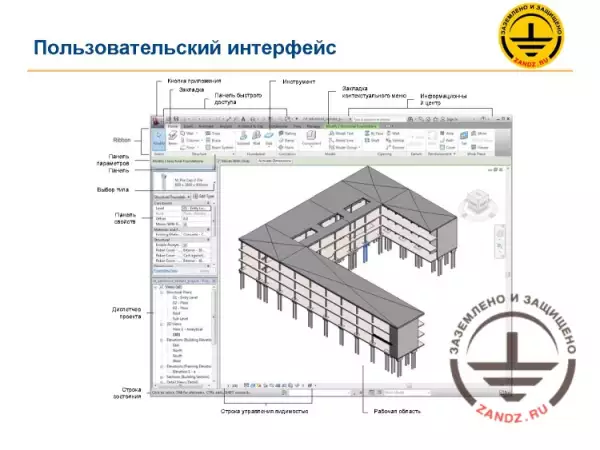
User interface
Пользовательский интерфейс - User interface
– Our first slide will consist of the picture titled “User interface”. It is rather old. Here you can see by the icon that if you have already launched Revit, then the icon is blue, but generally the structure, the user interface have not changed. Here, the same panels, icons are provided as in the current versions, more or less, something has changed, but this is not particularly important. The user interface is composed of, first, the toolbar on the top that is divided intuitively into separate tabs by sections and by function. The first tab in the new versions is the structure and utility systems architecture that may be turned off, if not needed, if there is something you do not use. And the further tabs are the stylization tabs, project management tabs, collaboration tabs, etc. All tools are located in this part. And in the center of the interface, we have a work area where we can see the model. And two essential windows include the property panel window and the Project Browser window. We will discuss it a little bit later to know what tools are used in these windows and what they are needed for. All the remaining tabs are not as necessary as these three. We will not discuss them.

Project template
Шаблон проекта - Project template
Шаблон проекта - это начальная точка проекта, содержащая в себе настройки и пользовательские объекты для работы с проектом - Project template is a starting point of the project that contains settings and user objects to work with the project
Шаблон 2017 Раздел КР - Template of Revit 2017. SP section
Шаблон 2011 Раздел АР - Template of Revit 2017. AP section
Шаблон Revit 2017. Раздел ОВ и ВК - Template of Revit 2017. HVAC section
– We will start with the work in Revit. It starts with the project template. What is a project template and what do we need it for? If you have worked in AutoCAD, and I think that each participant has, then you know that, when we create a “New Project” file in AutoCAD, then we choose a file that is usually named “acadiso” or something like that, if these files are used in your company. These are the templates, and there are also templates in AutoCAD, and they are chosen during the creation of the new file. It is all the same in Revit. We choose a file that contains the pre-configured items in Revit so that not to configure them each time when you create a new project. This is a starting point for the project. There, you can find all the required elements you often use in the project. Your project style is configured according to GOST, e.g., either according to the structure, or the style you use in your organization. The line thicknesses are set up, the special elements you use are loaded, etc. It contains anything you need for the successful start of the project. The better your template is configured, the faster and more efficient your work in Revit will be. At this step, we have three templates from the Autodesk community: the template for the SP section, the template for the AP section, and the template for the HVAC section (this is a single template that contains the elements for both HV and AC).
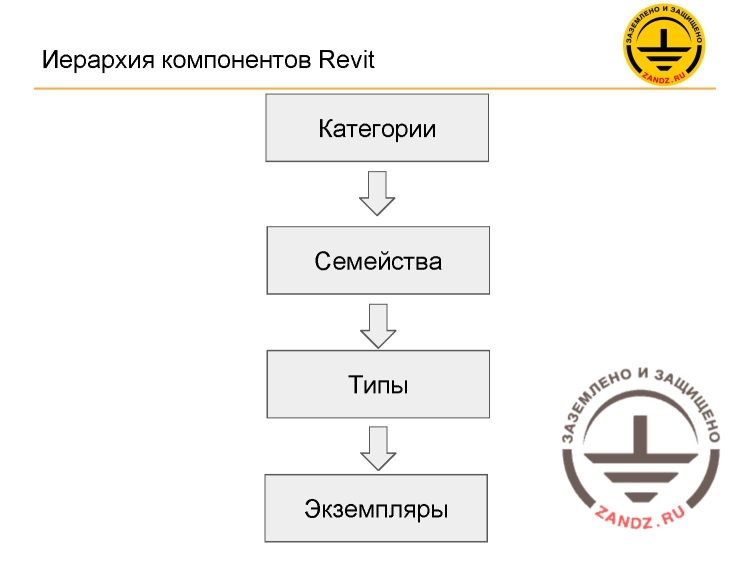
Revit elements hierarchy
Иерархия компонентов Revit - Revit elements hierarchy
Категории - Categories
Семейства - Families
Типы - Types
Экземпляры - Instances
– Let’s go on. So, what is Revit composed of and what is it? Revit includes the components. It is clear that Revit contains some elements, and this is our hierarchy of these elements. Revit does not contain any layers like AutoCAD. You only have families and family categories in Revit. Their hierarchy is provided here. The hierarchy is provided by the following structure: categories, families, types, and instances. We will consider all of these elements.
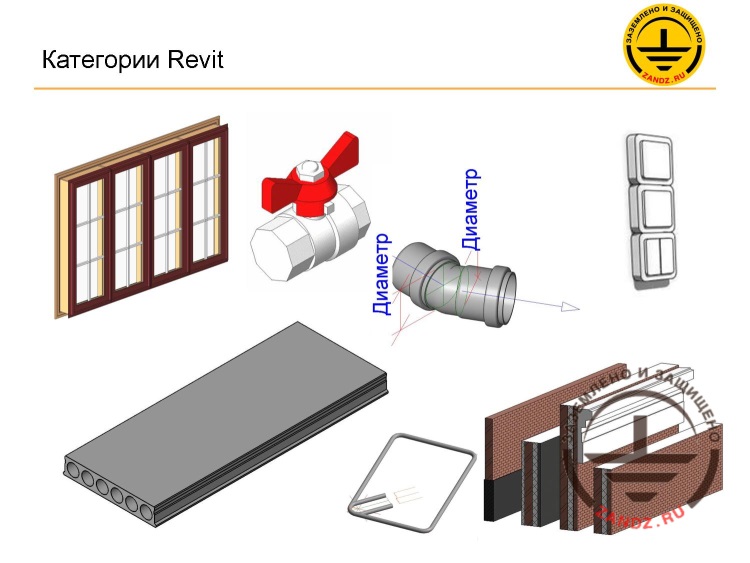
Revit categories
Категории Revit - Revit categories
>Диаметр - Diameter
– What is a category? The categories are the elements, of which the model consists. These may be any elements, from currents to switches, walls, intermediate floors, reinforcement, reinforcement elements, e.g., pipelines, air ducts, various fittings for pipe connections, pipes, any equipment, etc. There are many categories in Revit. But what point is in it? The Revit categories are defined by Revit. You cannot create user categories. But certainly, in some cases, it would have been useful to create your own category, but it cannot be implemented in the software. Although it would have been good from one point. But it would also have been bad from another point, because the possibility to create your own categories would lead to the chaos in the software. These may be not only 3D categories, not only the model elements, such as windows, equipment, sanitary equipment, reinforcement, etc., these may also be other categories. Let's look at them.
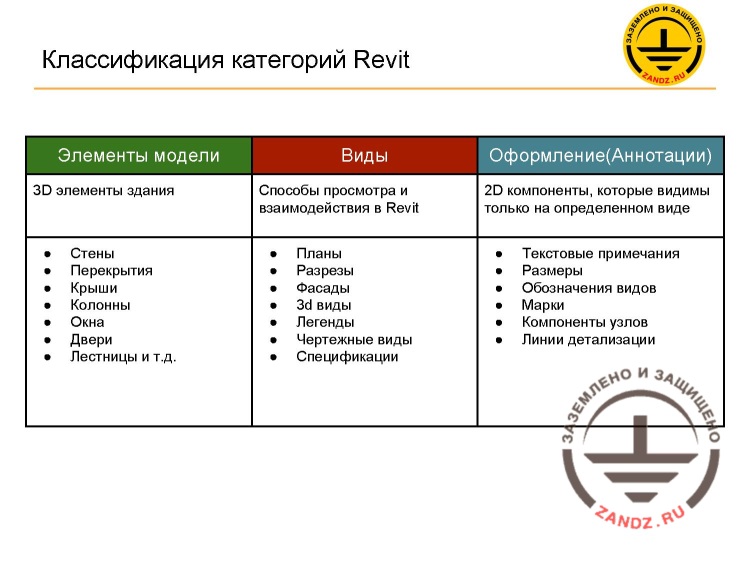
Classification of the Revit categories
Классификация категорий Revit
Элементы модели
Виды
Оформление (Аннотации)
3D элементы здания
- Стены
- Перекрытия
- Крыши
- Колонны
- Окна
- Двери
- Лестницы и т.д.
Способы просмотра и взаимодействия в Revit
- Планы
- Разрезы
- Фасады
- 3d виды
- Легенды
- Чертежные виды
- Спецификации
2D компоненты, которые видимы только на определенном виде
- Текстовые примечания
- Размеры
- Обозначения видов
- Марки
- Компоненты узлов
- Линии детализации
Classification of the Revit categories
Model elements
Views
Style (annotations)
3D building elements
- Walls
- Intermediate floors
- Roofs
- Columns
- Windows
- Doors
- Staircases, etc.
Viewing and interaction methods in Revit
- Plans
- Cuts
- Facades
- 3d views
- Legends
- Drafting views
- Specifications
2D components visible in particular views only
- Text comments
- Dimensions
- View designations
- Marks
- Node components
- Detail lines
– We have a slide classifying the Revit categories. We have three main categories, three main classifications: model elements (these are the ones shown in the previous slide, i.e. what our model consists of, the 3D elements), these are the elements of the category types (the ones through which we can interact with the first category, with the first model elements: floor plans, cross-sections, facades, 3D views, tables, specifications, sheets, legends, etc.; due to them, we can interact with the 3D models, we also need them), and the last thing from this classification is stylization or annotations; we can call them differently (these are the 2D elements that are seen only in particular views: text comments, dimensions, element marks, element designations, some detail lines; i.e. these are the ones required for us to stylize drawings in the project). So, what do we do? We create the model elements using the view elements. We create a plan, and in the plan, we create the model elements, and then, using the stylization elements and annotations, we adjust it to the acceptable result so that to obtain the detailed design documents. We have to understand that all of our elements, not only the model elements, not only the 3D elements, but also views and designs, the 2D tools, everything that we can see, is classified into the categories and families.
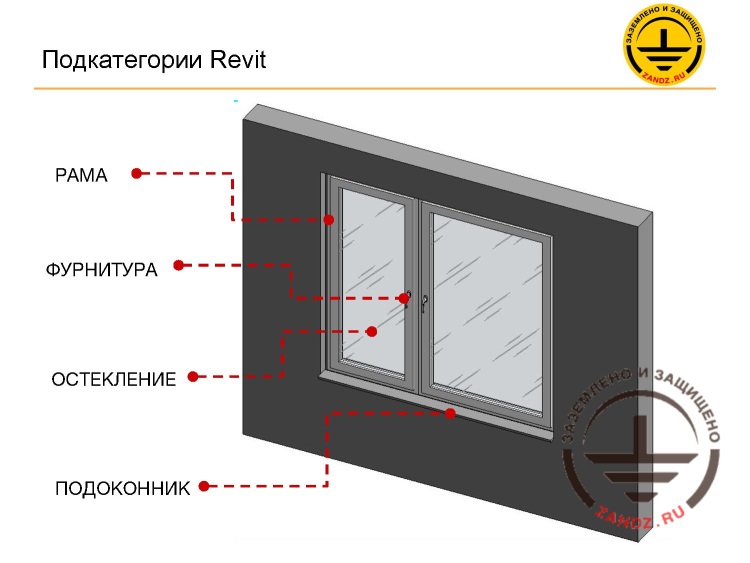
Revit subcategories
Подкатегории Revit - Revit subcategories
РАМА - FRAME
ФУРНИТУРА - FITTING
ОСТЕКЛЕНИЕ - GLASS
ПОДОКОННИК - WINDOW SILL
– Let’s go on. Any Revit category, almost any of them, may be classified into subcategories. Usually, the 3D model elements may be divided into the following subcategories: equipment, windows, fittings, etc. Each category may contain its subcategories, but there are also pre-defined subcategories created in Revit. What are they? Let's use this window as an example. We have a “window” category, and its subcategory may be a window frame, a window fitting, probably some locks, handles, window glasses, a window sill, etc. For example, we can make a drainage, an installation gap, i.e. anything we need. The same thing can be done with an element, e.g., the pipeline reinforcement; for example, we have a globe cock and we can make a separate subcategory, e.g., a handle of the cock, or something else. Or we can also turn off the graphical designation as a separate category. We can turn off each subcategory separately.
Next page >>
slides from 8 to 14
Related Articles:
 Webinar «Software structure and general concepts of revit», page 3
 Webinar «BIM design in Revit. Getting started», page 1
 Webinar «BIM design in Revit. Getting started», page 2
 Webinar «BIM design in Revit. Getting started», page 3
