Webinar text. Page 3
Fast navigation by slides:
Page 3:
15. Project parameters
16. Parameter properties
17. System (nested) parameters
18. General parameters
19. General parameter file
20. Project browser
21. Questions and answers

Project parameters
Параметры проекта - Project parameters
Параметры проекта - Project parameters
Параметры, доступные элементам проекта: - Parameters available for the project elements:
Добавить… - Add…
Изменить… - Change…
Удалить… - Delete…
ОК - OK
Отмена - Cancel
Параметры проекта используются для формирования спецификаций, сортировки и фильтрации в рамках проекта - The project parameters are used to generate specifications and to sort and filter within the project
- Let’s go on. What else is associated with the parameters? Each project has the project parameters. We can add, create, delete, or change them. The project parameters are used to generate specifications and to sort and filter within the project. Each project has a particular list of parameters. We can create user parameters, e.g., if we need a new parameter that is missing, such as structural fire safety or something else, then we can add it. Moreover, we can change the existing parameter at any point, change its structure or delete if it is not needed. But actually, we have to be careful here because it is very often that when you open a project, and there are many of such parameters, and they repeat. I opened projects that included parameters, e.g., with five similar names, five directors, five designation parameters that duplicate each other. This is very bad. It demonstrates the competencies of the designers, the BIM manager, and the BIM coordinators. You should not do it like this. We should have one parameter that meets certain requirements.
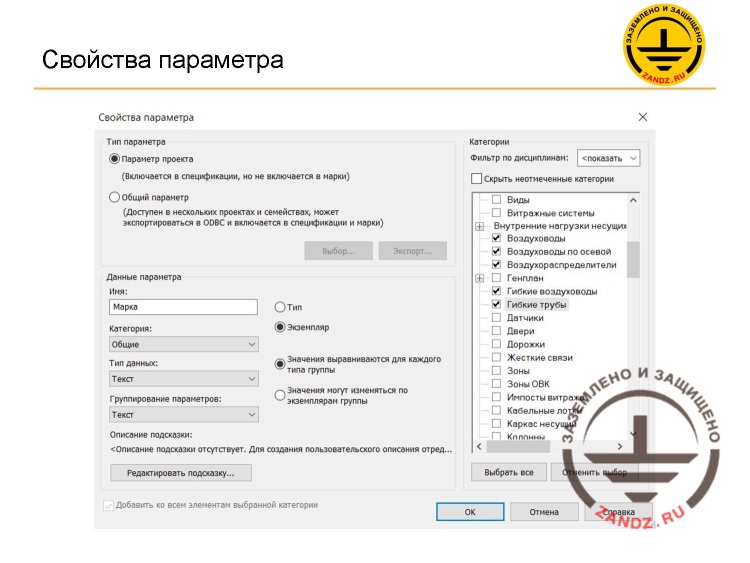
Parameter properties
Свойства параметра - Parameter properties
- Let’s go on. Each parameter has certain properties. Here, we define our parameter's name and determine to what category it may belong. It may be a general category. It may relate to the electrical equipment, to the heating and ventilation, or may relate to the pipelines, etc. Each category has its own particular data type set. For example, in the “general” category, we have the data type such as text. You can enter the element name, the element designation, etc., i.e. everything that is associated with the text. For example, if it is a category of heating and ventilation, then the data type may be the consumption or the power of an element, etc. Next to it, we can choose, what kind of parameter it will be: type parameter or instance parameter. Let's remember that the type parameter is responsible for all instances of this type, while the instance parameters are responsible for a particular single element. And we have the categories on the right. To which categories will this parameter relate? We can determine a certain category or we can determine several categories at once. For example, we can define air ducts, air distributors and flexible air ducts, and flexible pipes. And all of these categories will have such new parameter. It is exactly due to this the problems I mentioned previously occurred, when we had several parameters with the same name in the project parameters, for example, for several elements.
System (nested) parameters
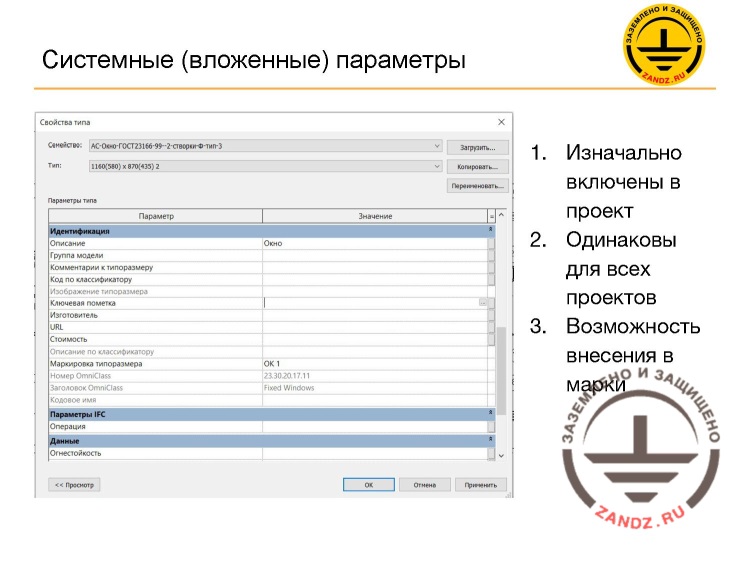
Системные (вложенные) параметры - System (nested) parameters
Изначально включены в проект - Included into the project from the beginning
Одинаковы для всех проектов - Are the same for all projects
Возможность внесения в марки - Possibility to add in marks
- Let’s go on. In addition to the parameters that can be created independently, Revit pre-defines some parameters in the project. These are the so-called system or nested parameters. Similar to the system families that cannot be deleted from the project, we have a system parameter that also cannot be deleted from the project. Here, some system parameters are provided. There is an identification section and all the parameters you can see there are system and cannot be deleted. Description, model group, comments to the unit size, classifier code, etc. What are these parameters required for? Why do we have a certain set of pre-defined parameters we cannot delete? They are needed to use in different projects. They are the same in all projects. You can add these parameters in marks and specifications. This is a so-called common base for all projects. All of these parameters and elements are available in different projects. If you create a mark that will record the parameter in the description of this mark, then this mark will be used in all projects without any problem. What other parameters do we have in addition to the system?
You could see the parameter type on the top of the previous slide. We can create the project parameter. And there is also the so-called common parameter. The project parameter; you can see in brackets that it is included in the specifications but not included in the marks, whereas the common parameter may be included in the marks. What is it? What do we need it for?
Common parameters
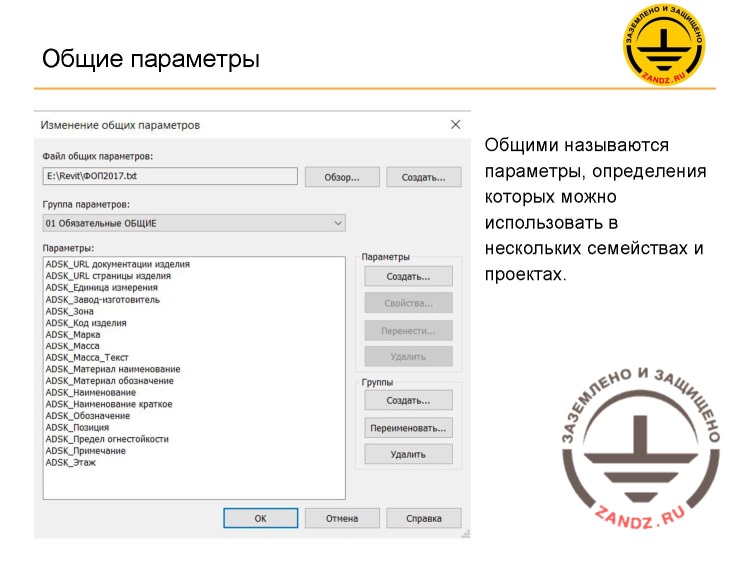
Общие параметры - Common parameters
Общими называются параметры, определения которых можно использовать в нескольких семействах и проектах - The common parameters are those, the definitions of which can be used in several families and projects
– There is a group of common parameters in Revit. It is also important to know about them and what they are needed for. The common parameters are the definition parameters that can be used in several families and projects. For example, if we previously created the project parameter, then we could only use it in this project. And if we tried to create a mark by this parameter, it would not have been possible. There are the system parameters that are initially embedded in this project, and the marks work by these system parameters. And if we need to create a parameter so that the mark would work with it and we could use it in other projects. In general, it is the parameter missing from the system parameters, but we need its functions as a system parameter. This is what we need common parameters for. The common parameters are a very interesting thing. Similar to the loadable family, the common parameters are created as a separate file. We have a separate file with the common parameters where we write the list of the required parameters, which can be used in different projects, and create the marks by these parameters. It is as follows. The common parameter file; as we can see, there is a path to the folder; we can see various groups there; and here is the parameter list that we need to work well in Revit.

Common parameter file
Файл общих параметров - Common parameter file
Файл, на котором хранится информации об общих параметрах - The file where the information on general parameters is stored
– Where is it located? The common parameter file is stored somewhere in the computer. For example, this is a path and a file, and the file is a typical text file. I will tell you that this text file cannot be changed at all. All changes in this file should be made in Revit. It is better to avoid opening this file and writing something inside of it even though you know exactly what to do there. It is better to do everything in Revit because there is the possibility to corrupt the file.
Project Browser
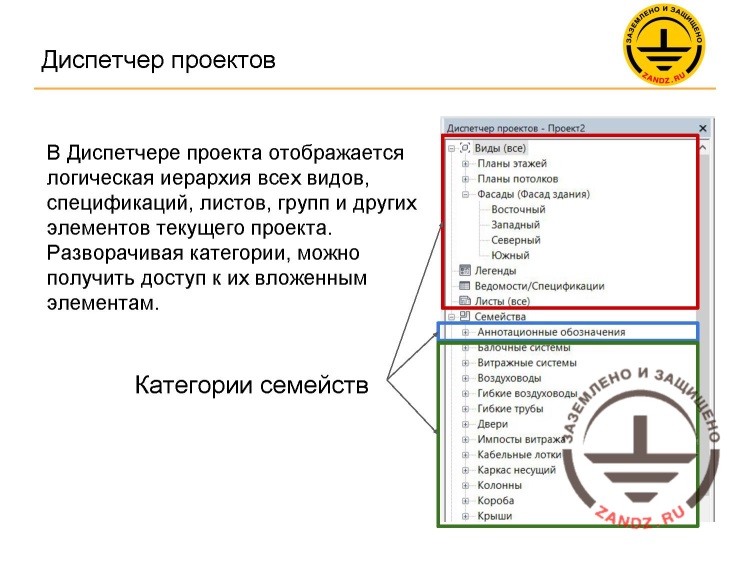
Диспетчер проектов - Project Browser
В Диспетчере проекта отображается логическая иерархия всех видов, спецификаций, листов, групп и других элементов текущего проекта. Разворачивая категории, можно получить доступ к их вложенным элементам - In the Project Browser, a logical hierarchy of all views, specifications, sheets, groups, and other elements of the current project are shown. Unfolding the categories, you may access their nested elements
Категории семейств - Family categories
– So, we have completed studying the parameter section. We have the final tab, the Project Browser. We have a tab. I have shown it in the first slide with the user interface; it is a so-called Project Browser. What is it? What do we need it for? The Project Browser shows a logical hierarchy of your project, the views and everything you have, everything you have created, all the families you have uploaded into the project, different annotations, 2D view of marks, designations, annotations, etc. Everything you have in the project can be found in the Project Browser, but there are several exceptions. Some annotation families are not shown there such as detail lines, text, and some family categories are also not shown there. But the most essential part of everything you have created and uploaded can be found in this Project Browser window. I have divided and, thus, highlighted the particular zones with the frames. We have a red zone, which is view categories. We have a blue zone, which is a category of 2D designations, annotations. And a green zone, which is a category of volume elements of geometry, the model elements. You can make an analogy with this slide. Here, the green elements are also the model items, red are view, and blue are styling. The same colors, the same categories are provided in this slide.
– Red are views, blue are annotation designations, green are the model elements; all of them are provided here. The entire logical structure and hierarchy are provided here.
– This is where my report ends. Thank you for attention!
– Question from Sergey: “How to edit a template?”
– Yes. You can edit the template. When you launch Revit, it offers to either create a project based on the templale. There will be the “Project” button; or you can switch the button from “Project” to “Template”, and you will be able to edit the template. You can create the template from scratch. In this case, you have to choose the template from the list, when you create a new project , it contains the “no” value. And an empty Revit opens; there will be system families only. We remember that the system families cannot be deleted. There will be system families. And you create the project from scratch in an empty template. I hope I have answered your question.
– Write to me if you have more clarifications.
– There is more. You cannot create a category. There are pre-defined categories in Revit. You can create your family, Revit allows this.
– “Why cannot I create my own category? For example, there are no built-in templates for the electrical equipment.”
– Yes, there are no templates for the electrical equipment. They exist, i.e. some companies working in Revit have created their own templates. They work with them. But Autodesk has not provided the official release of it in Russia. So, there are no templates.
– “Why cannot I create the necessary “box” categories?”
– There is a category such as “boxes”; it is a system family called “boxes”. Revit is developed this way. You cannot create a category but you can create a family. You can create any loadable family. We made busbars, and they were created as a loadable family; it is a very complex family having a complex geometry. There is no separate category for busbars in Revit. You can either make it as a box in the system family or create a loadable family. For example, assign a category of special equipment to it and make a busbar within this category. This is the logic.
– “The template for the electrical equipment you mentioned in the beginning; will it be adapted to the Russian design standards?”
– Yes, of course. I cannot say anything on behald of the Russian Autodesk Community, but similar to the HVAC, AP, SP templates, they are adapted to our design standards.
– “Where can we download the ready-made family for the electrical equipment?”
– The ready-made families for the electrical equipment are available. I cannot say for sure. There are websites with the catalogues of the family libraries, but I have not used the families for the electrical equipment.
– If I understand it correctly, it is a matter of time, I mean the appearance of these families.
– Yes, I think, it is a matter of time. This year, Autodesk will probably release the template for the electrical equipment, and, thus, it will have a minimum amount of the families in this template. This is the same as it was created for AP, SP, although I cannot say it with the 100% probability, but this is possible.
– Good. Valery clarified: “Do we need a family for each cable?”
– It is a very interesting thing for the cables. Actually, the cable family does not exist in Revit in the form of model elements. For example, you need to lay a cable from one piece of equipment to another. You create a circuit diagram. You choose one element, another element, and then form a circuit between them. All elements are gathered into circuits, and you can simply calculate the length of the indicated cable. But the cable itself is not modelled. If you model the cables, then your more or less large project will halt. It is a huge complexity.
– OK, thank you. More clarifications from Victor: “Do dynamic families exist?”
– What do you mean by the word “dynamic”? Do you mean that they can change? Yes, using the parameters, we can define the dynamics for these families. As I have already shown, we can create several types for the same family, and using the parameters, we can create dynamics, we can parametrize them. For example, using various parameters, you can change width, height, some attributive information: name, designation, etc. You can say that you can create a family that will not change at all, that will not have the set of properties and that will be static. You have placed it and you cannot do anything with it. But for the most part, surely, you have to create dynamic families so that you could use them in various projects. This is done using the parameters.
– Thank you. Dear colleagues, do you have more questions? Two more minutes are left. If you have any questions, write them and we will answer.
Since I cannot see any more questions, thank you for the participation. We are waiting for you in the next webinar. Let me remind you that it will be held on May 24. The information is provided on our website. Register either for this webinar separately or for the entire series of webinars. Those who have registered for the entire series, will receive notifications of the forthcoming webinars. Thank you! We will end at this point. See you next time!
– Thanks to everyone. Bye!
<< Previous page
slides from 8 to 14
Related Articles:
 Webinar «Software structure and general concepts of revit», page 2
 Webinar «BIM design in Revit. Getting started», page 1
 Webinar «BIM design in Revit. Getting started», page 2
 Webinar «BIM design in Revit. Getting started», page 3
