How I decided to save on installing ZANDZ ZZ-6 grounding kit
I want to share my experience of installation of grounding in a single-family house on my own. I made it not for protection, since the RCD, in my opinion, provides excellent protection even without protective grounding, but for technical needs. Having bought all sorts of electrical things for home, I found out that many of them need a grounding for proper operation. For example, inside a boiler (water heater) there is a protective anode, which takes on all the destructive processes and does not allow the tank body to rust. But for its operation, it must be connected to grounding. Network filters also do not work without grounding - they have nowhere to dump the noise to or something like that. And all this kind of stuff. Classical options with the burial of rusty metal things and welding them with a tape did not appeal to me. And I found a kit of easily installed grounding for a single-family house on the net - ZANDZ ZZ-6. ZANDZ ZZ-6 is a complete grounding kit for installation on your own. You only need a sledgehammer and you can do it on your own alone. I found very few reviews about installing this grounding, basically just a discussion, so I decided to write my own.
I liked everything - I decided to try it and bought a kit! Inside the kit there are 4 connecting rods (each is 1.5 meters, a rod in the ground will be about 6 meters), connecting sleeves, a driving head for hammering and bolted fastening for the wire. It is very carefully packed - the rods are put in the foam tightly and on the ends there are pieces of plywood, so nothing can damage the box under any circumstances. The package is heavy- it's hard to carry it alone! The tip of the rods is pointed. The rods are connected one to one, so the other end of the rod has a hole filled with protective paste, in order to insert the next pin into it. A driving head is put into the same hole. You should not hit on the rod itself! Only through the black driving head inserted into the hole. When hammering, the thick paste in the hole does not allow the driving head to jump out. That's convenient.
In the end, everything should look like this: the hole of the last rod is filled with sealant, the bolt clamp is put on the rod, it is of a very high-quality, made of stainless steel, which connects the rod to the wire. The wire must be 16-25 square mm, is not included into the kit. I bought it separately on a sale in a specialized store, as well as a 10 mm bolt clamp terminal, which I pressed with KW pinchers.
It's everything about the details, now the most important thing - the installation is not as easy as on the video! The video shows how it is easy to hammer the first rod, then they show how to put the plate with bolts and wire. However, it is very difficult to hammer even in clay with sand.
There are two installation options:
- Outside, but then it's necessary to dig a trench to bury the rod and wire from the weather in it, and drill the foundation to enter the wire into the house.
- In the house in the basement - you do not need to bury, you can leave it on the surface, you do not need to drill anything either.
First I wanted to hammer the rod in the basement. I hammered the first rod, inserted the second one and it did not go, there was very little room for the swing and it was already hard! It was necessary to pull out everything with the help of a pipe holder and a jack. At the same time I checked the quality - the steel rod with copper coating, and despite the fact that the pipe holder scratched the copper coating, it did not reach the steel - the coating turned out to be very thick and high-quality.
I began to hammer outside. You can not simply hammer it outside, you need to dig a 0.5-0.7 meter deep trench, hammer and conduct a wire on its bottom and then cover up with soil. And the wire in this case is recommended to be not 16, but 25 square meters, but I already bought PV-1 for 16 - I though it will be fine! The first rod was well hammered, in the middle of the second one it became harder and the third one was hammered with great difficulty. If one hit of the sledgehammer immersed the second pin to 5-7 mm, then on the third pin - 0.25 mm. It goes, bbut it is very hard to do manually. It is hard to hammer alone, because the rods vibrate to the side when being hammered. This all complicates the process a lot, so one person must hold the rod with both hands, and the other - to hammer. As a result, I could not hammer the last fourth rod, I asked the third-party installer to do it. At first he flaunted that it was easy and only male power was needed, but then he quickly got tired, kept silent and rested.
The result: do not try to install it alone, this is a damnedest work! It's better to have three people to hammer, and all of them should be strong men. One should always hold the rod so that it does not vibrate and does not injure hands. It's better not to try putting it in the basement. You try one rod, and it seems to you that there is enough room for a swing, but you won't get the rod to the end. When you insert the next one, it will be much higher than you expected. If your ceieling in the basement is not 3 meters, you just have nowhere to swing arms. Drilling the floor and hammering in the house is impossible. When the last rod reaches the floor level of the house (the basement ceiling), you will have nothing to hammer it further. Try outside. You need to dig a hole there and drill a hole in the foundation, and this also costs money, but in this case everything will be done as it should. In my case, a hole was already dug for the pipe, and a hole was made under it in the foundation. The wire in corrugation went there too, then I covered everything with foam.
In general, I liked the kit, it's of a very high quality. They promise a service life of 100 years in non-aggressive soils. I do not have a meter to measure grounding resistance, but I think the manufacturer does not lie and everything works as it should.
(Source: https://vk.com/wall-106722633_417)
See also:
- Install ZANDZ modular grounding in a country house (Feedback about ZANDZ products)
- Installation of grounding in the Star City by the ZANDZ Club of Experts!
- Let's make a resistance of 2 ohm! ZANDZ grounding installation feedbacks
Related Articles:
 Grounding in the cellar of the single-family house - is it possible?
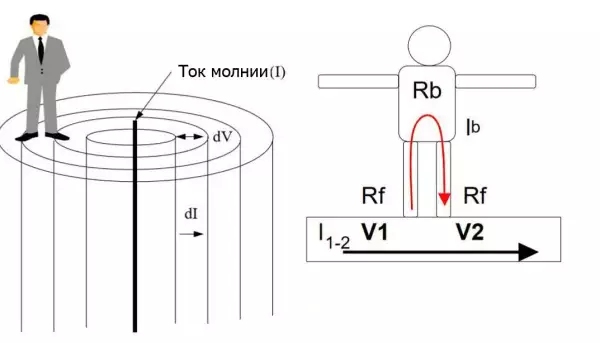 Step Voltage: Dangerous Obscurity and Reliable Protection
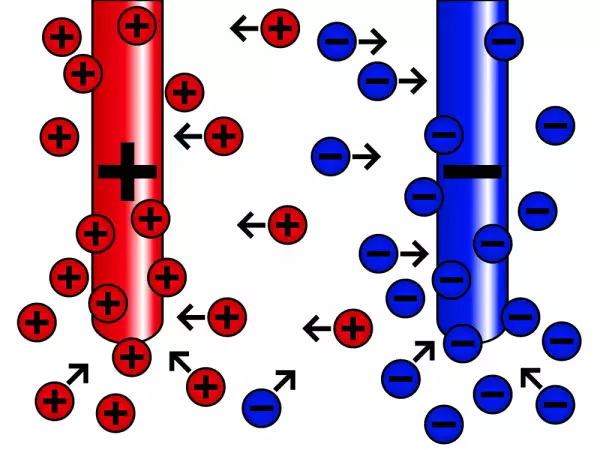 Nature of Electrochemical Corrosion
 Public Safety in Land Transport in case of Direct Lightning Strike