Webinar text. Page 3
And now they are shown in meters, this is just what we need. I need the actual length, that is why I am hiding this column, too. You do not need to delete it. If we do that, then we will have no data for the “Length with a Factor” column for the calculation because it will also be deleted. So, we hide it. And the length with a factor can be simply renamed to the length. Or “Length”, and add in brackets that it means 20% surplus.
Demonstrating "display in meters"
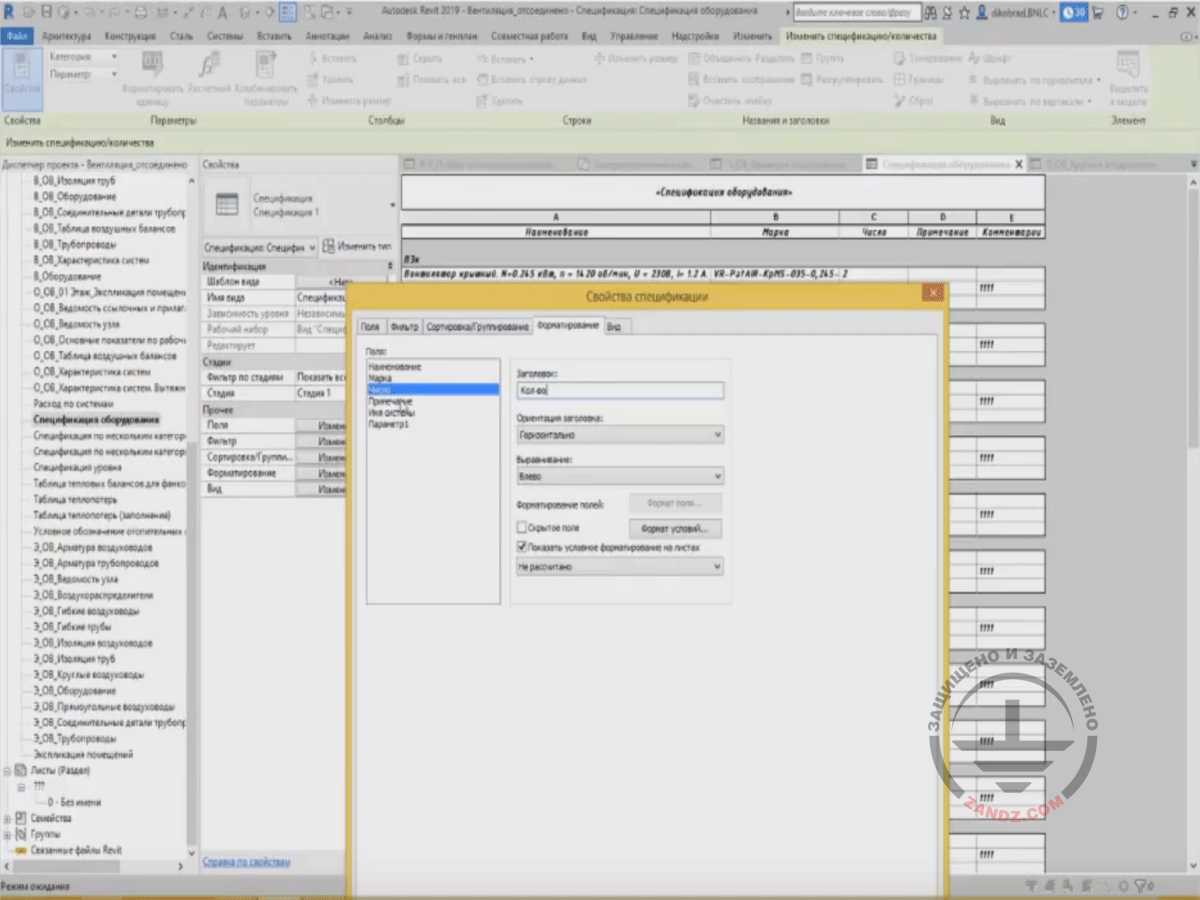
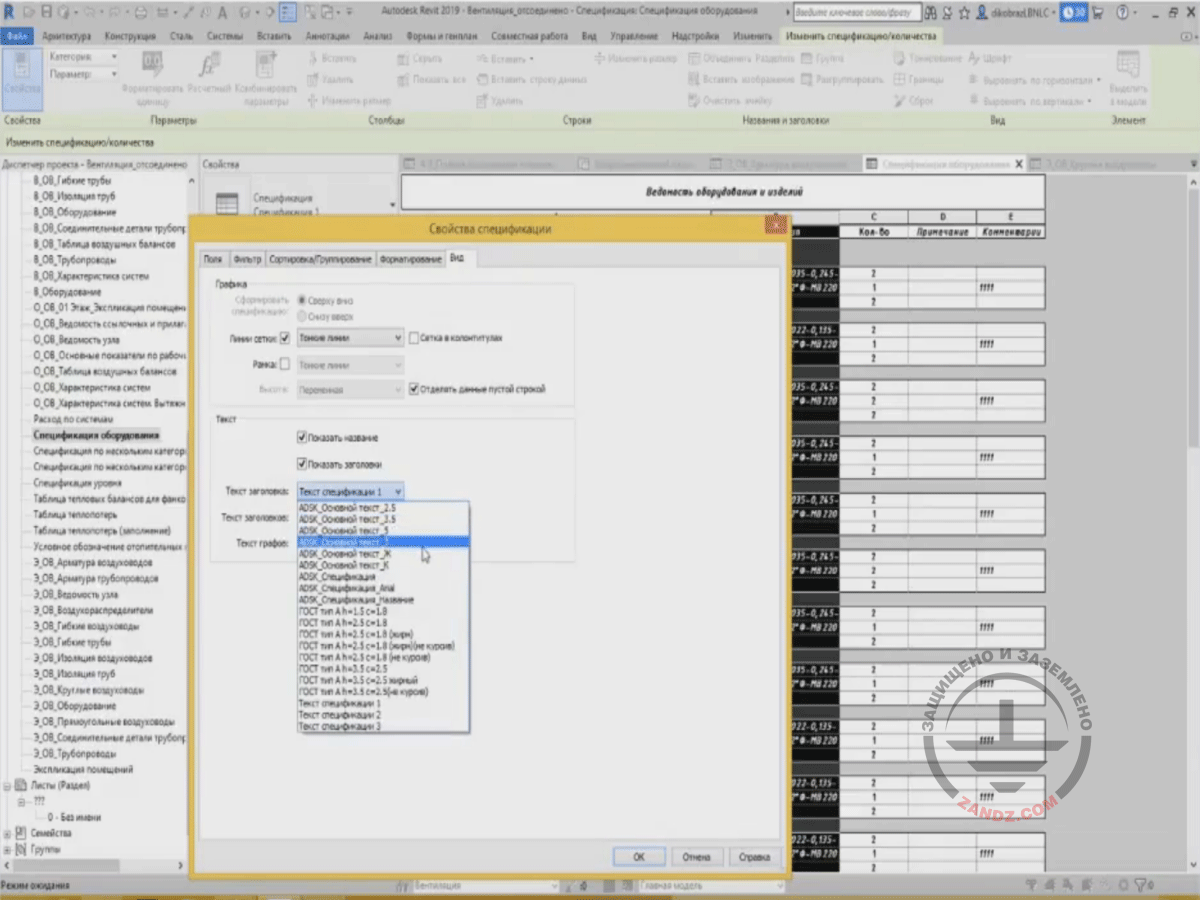
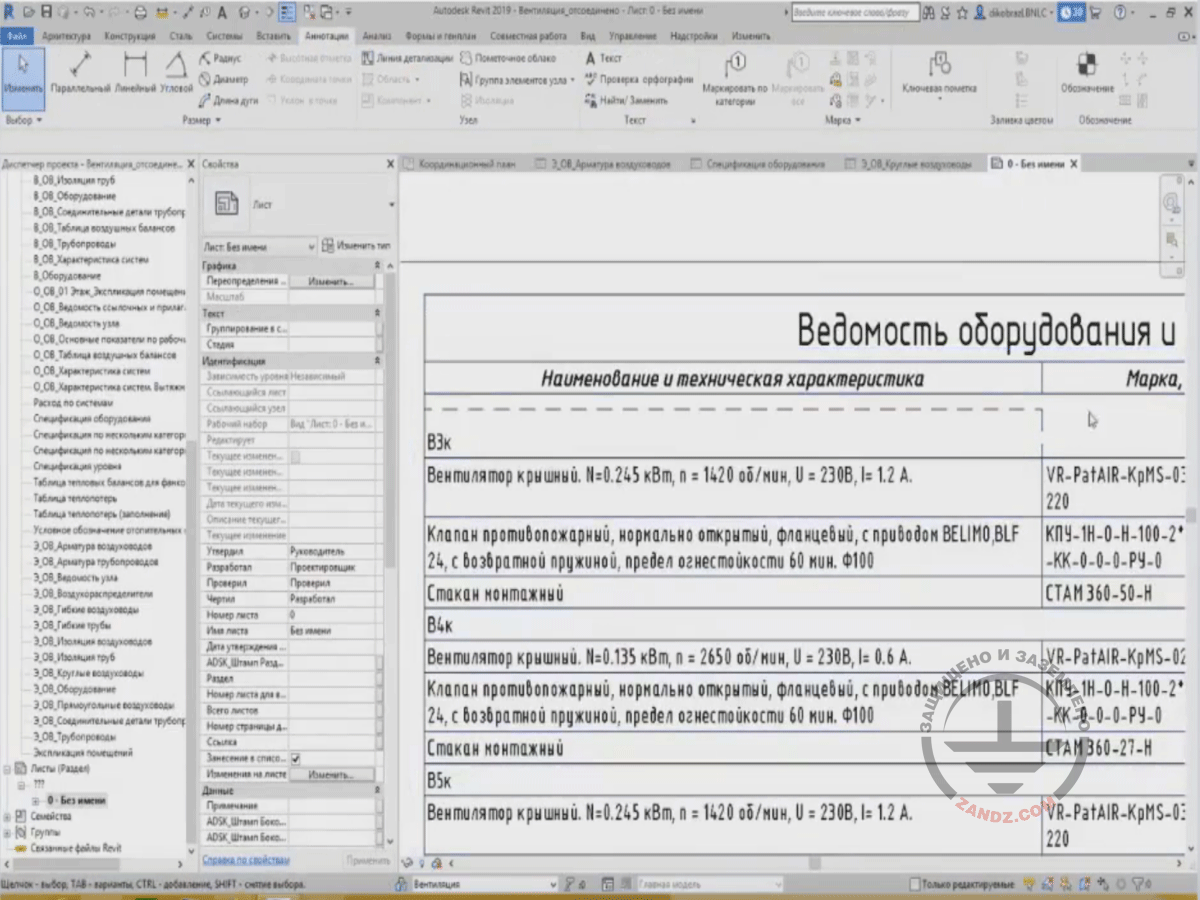
Let me continue. Now, let's get back to our table with the equipment that was created in the “Equipment Specification”. What’s left there? We have to consider the specification display, for example, how to change the font, how to change the value arrangement so that it would be in center, etc. When you create a specification, it often happens that the parameter values may not correspond to the value in the headings you need. For example, here is “Parameter 1”, and I can rewrite this parameter, e.g., use “Comment” instead of “Parameter 1”. The same operation can be done in the “Formatting” tab. In the “Formatting” tab, we have “Fields” and “Heading” that will be shown in the table. For example, “Name and Technical Characteristics”. Instead of “Marks”, you can use “Mark, Type”.
Specification display
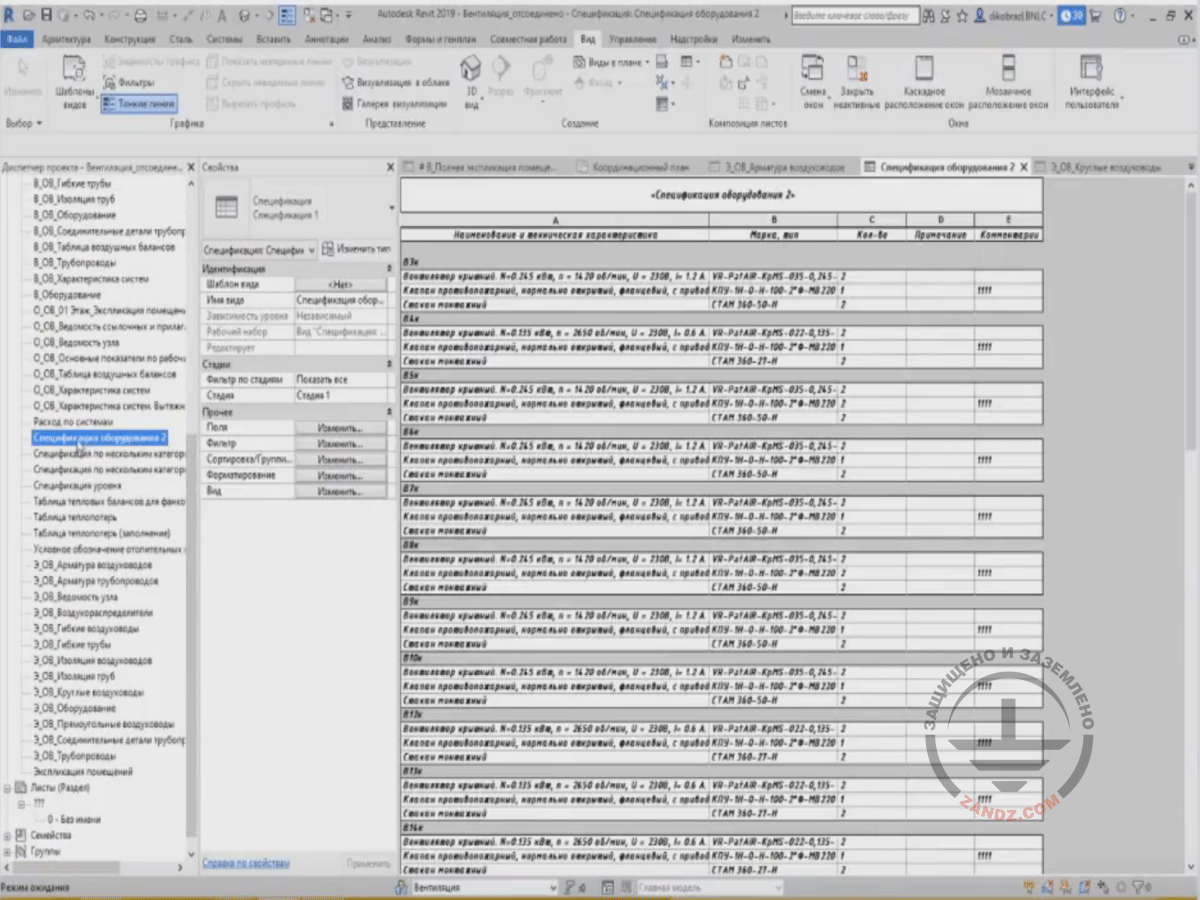
After all these activities, press OK. All the names have changed in the headings, and you can also change the specification name. And now if I change the title of this specification, e.g., to “Equipment Specification 2”, then I will see that my specification has also changed in the Project Browser.
Demonstrating the change in the heading names
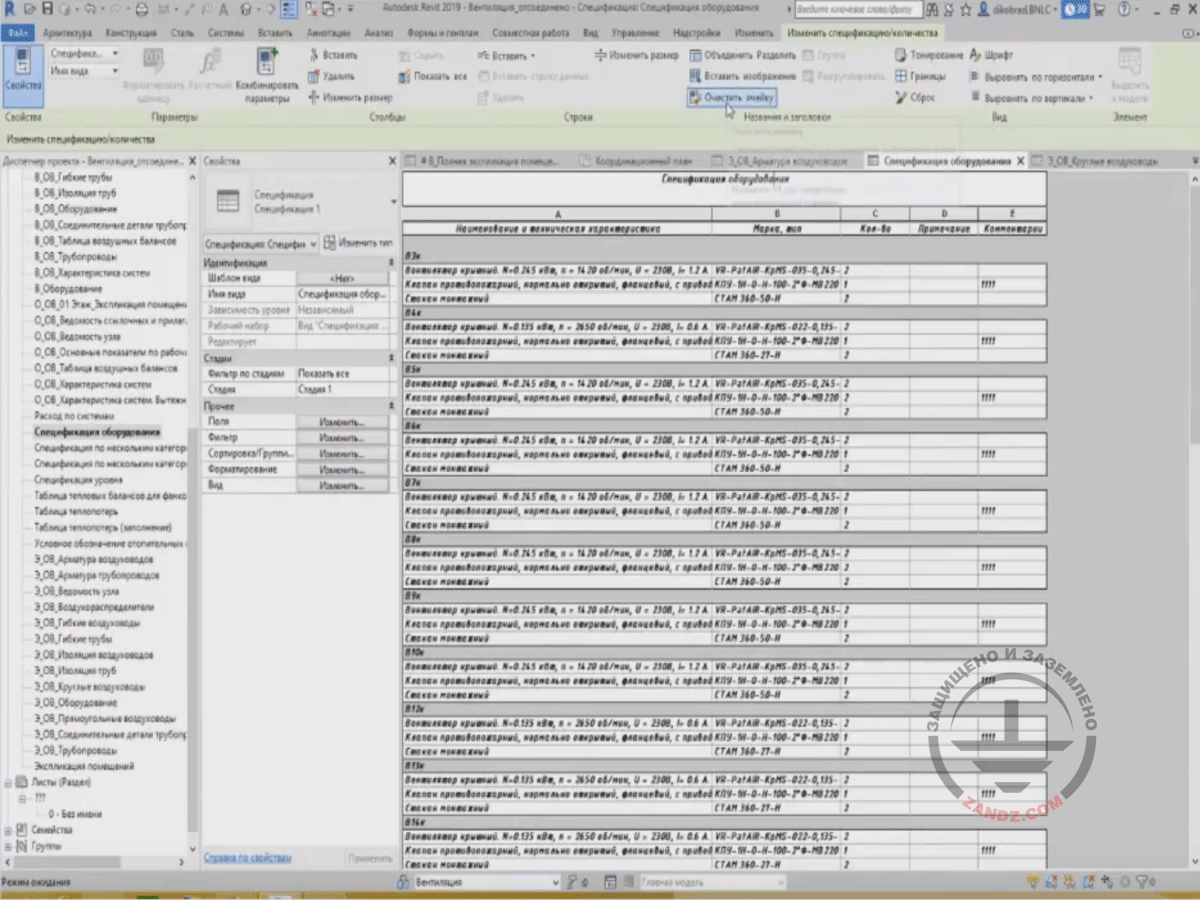
But it happens often that the specification name in the Project Browser should be different from the title name. Therefore, we also have a way out from this situation. For example, I need to enter “Equipment Specification”, and something more detailed in the name. So, I highlight the name and press “Clean Cell”. After cleaning the cell, I can enter anything I need, e.g., “Bill of Quantities for the Equipment and Products”, press Enter, and we can see that the name has not changed in the Project Browser, but it is different here.
Changing the heading name
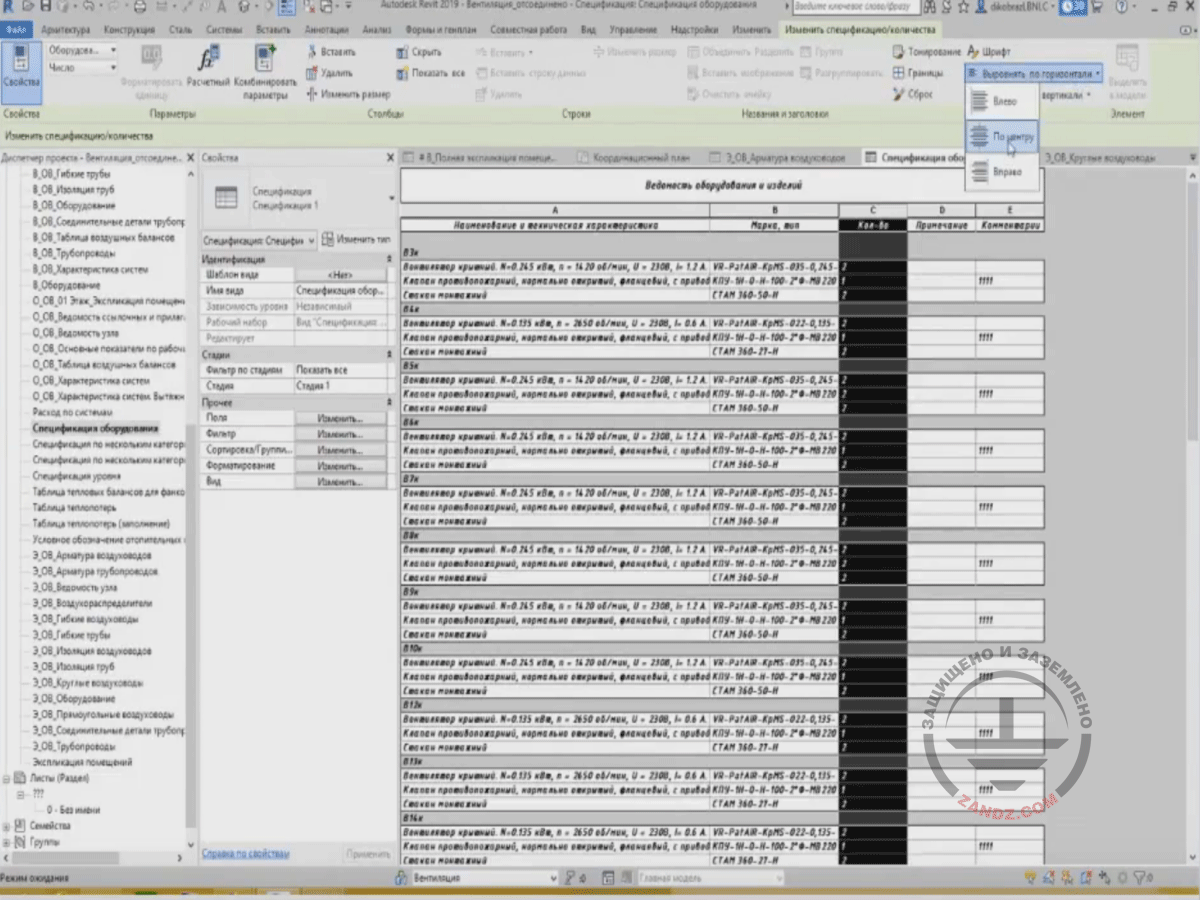
Then, all activities with the display, with fonts, font thicknesses, etc., may be performed from the task bar. We have a font, boundaries, horizontal or vertical alignments here. Let's choose our quantity column and align it to the center. To do this, we highlight the column. We have to press the literal designation of the “A, B, C, D, E...” column. It highlights the entire column, and we press horizontal alignment on center. Then, we can change the font; let's remove the italics; it has changed. This way, we can change a particular column.
Display
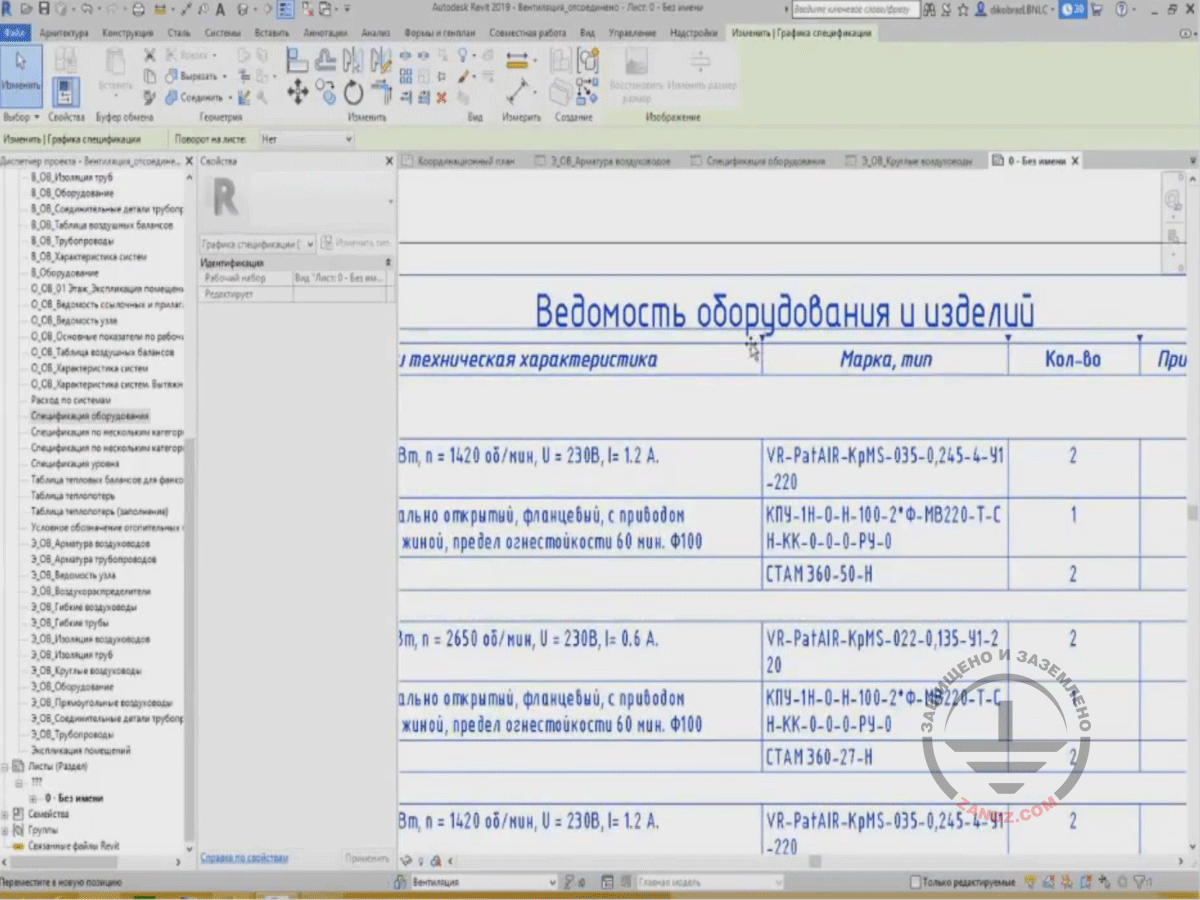
How can we change the entire Bill of Quantities? For example, change its font? Go to the “View” tab; visibility is available in the “Text” section. We have “Heading Text”, this is the heading in the place where it is stated “Bill of Quantities for the Equipment and Products”. Then, “Heading Text” means headings of my parameters, their names. And “Graph Text” means all the rest that is located here below. We choose a certain font, e.g., for the heading, we can use a bold text of 5 mm. And for the “Graph Text”, we will choose the main text 2.5 and press OK. Here is what we have now. I have a rather large text here, and it has also changed below. So, we have created the Bill of Quantities. Let's place it onto the sheet.
Changing Bill of Quantities
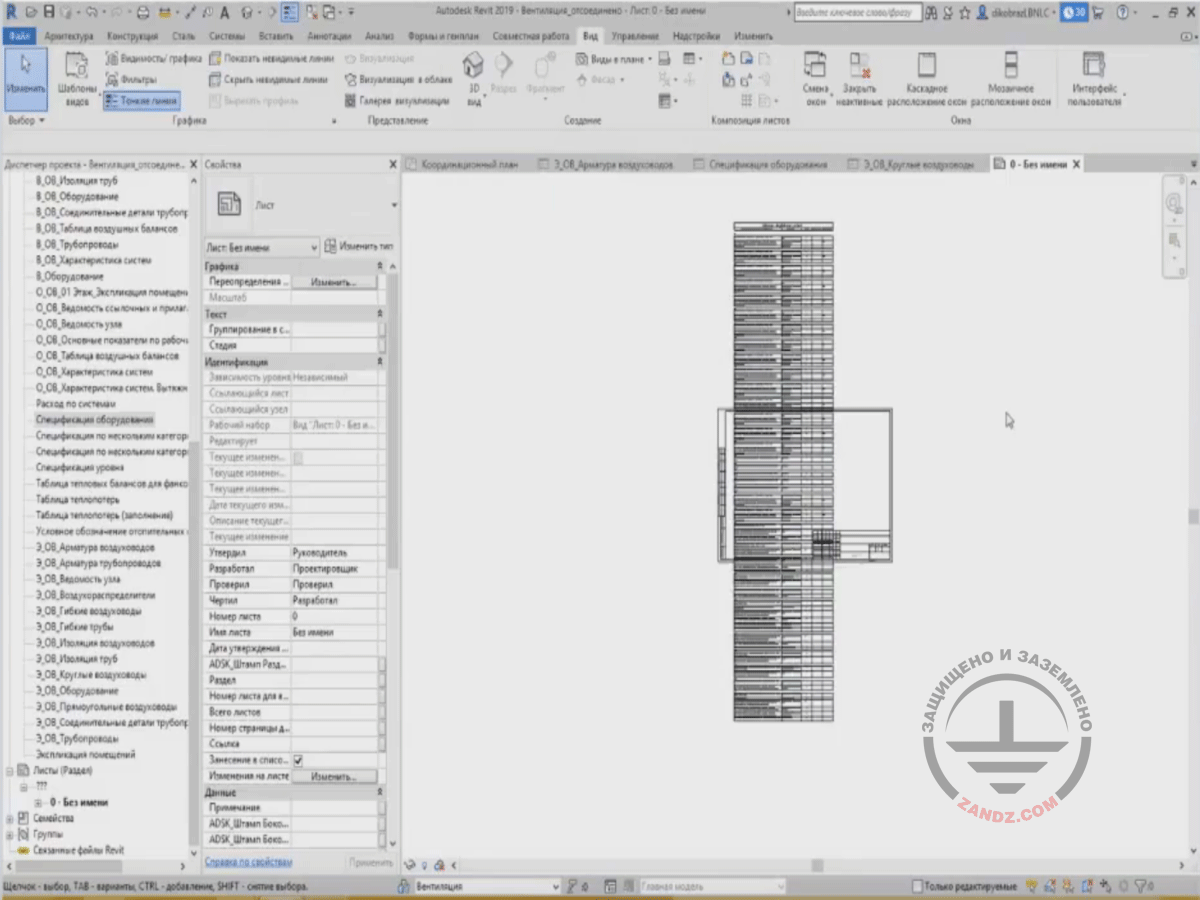
Placing the Bill of Quantities is easy; let's go to the sheet with a frame. And we have two options for placing the Bill of Quantities. We can press the “Place View” button in the “View” tab and find the required Bill of Quantities. But it is surely difficult because we have many views. Here are also plans, 3D views, and everything else because we have an easier option: drag and drop the required view with the specification from the Project Browser. I just highlight it, hold the mouse button and drag here. This is the Bill of Quantities. There are many values; therefore, it is clear that we will have to place the Bill of Quantities on several sheets.

Placing a Bill of Quantities
Let's align it on the sheet. I will place it on a larger sheet, e.g., A1, so that it would suit. If your Bill of Quantities is large and long, then when you highlight it, a small zigzag appears in the center. This button divides the table into two.
Aligning the Bill of Quantities on the sheet
So, let's go on. Moreover, you can change the width of the columns from the sheet. When you highlight, the triangles appear, which I can pull and thus change the width of the graphs adjusting them according to the required width. Unfortunately, there are no ties to obtain the exact value, e.g., 10 cm; it is all made by sight.
Changing the column widths
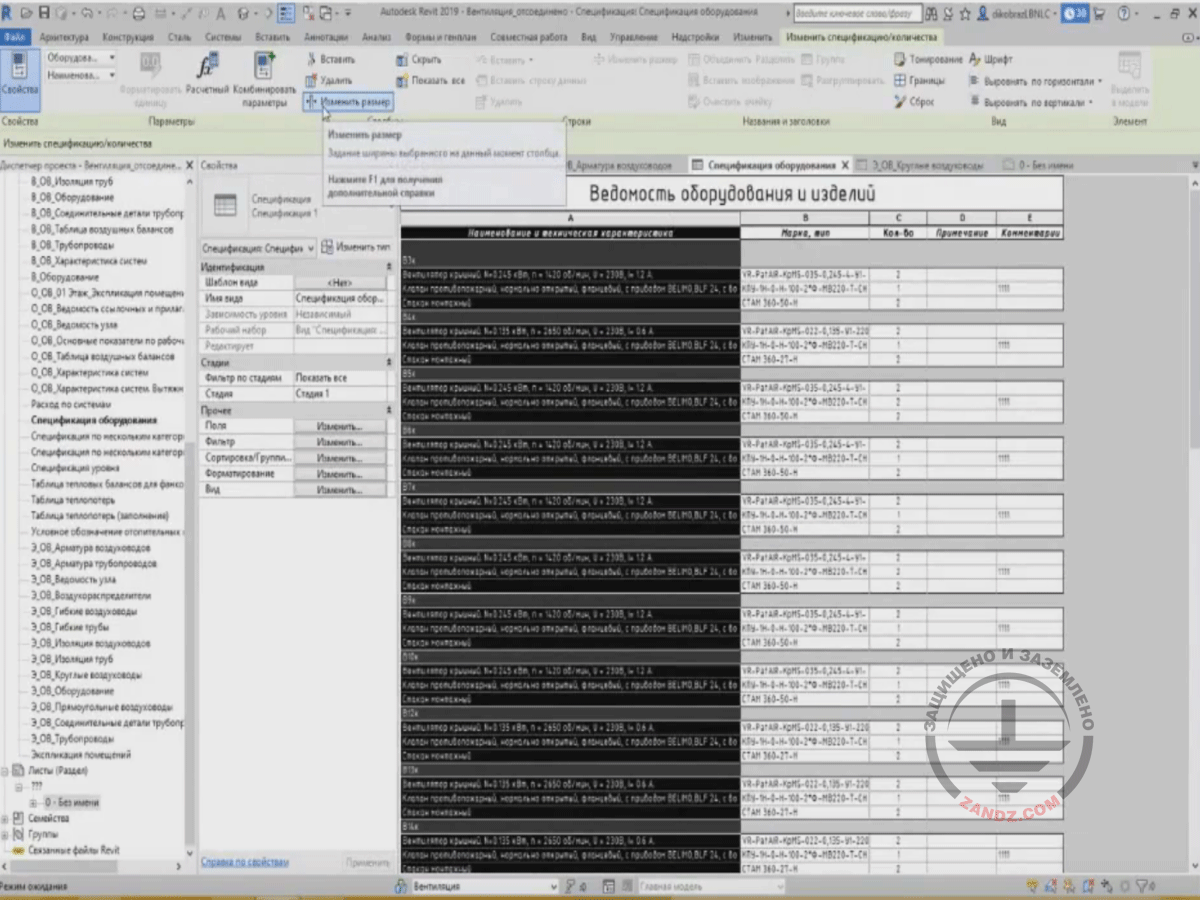
If you want your table to be even and have whole values, then you should do that only from the Bill of Quantities. By the way, to edit the Bill of Quantities, if you have placed it on the sheet, you may double-click the bill, and Revit will automatically go to the editing mode. And here, when you highlight certain columns, we can change their values. For example, I highlight “Name and Technical Characteristics” and press “Change Size”. And you can see that the value is not even, let's make it even, and let it be 120 mm; press OK. You can do the same for the remaining columns. We will not see any significant difference, but it exists.
Adjusting table values
You can measure them. For example, create “Detail Line” and set approximately 120 mm. And you can see that the line is precise, and this column is exactly 120 mm.
Measuring the created values
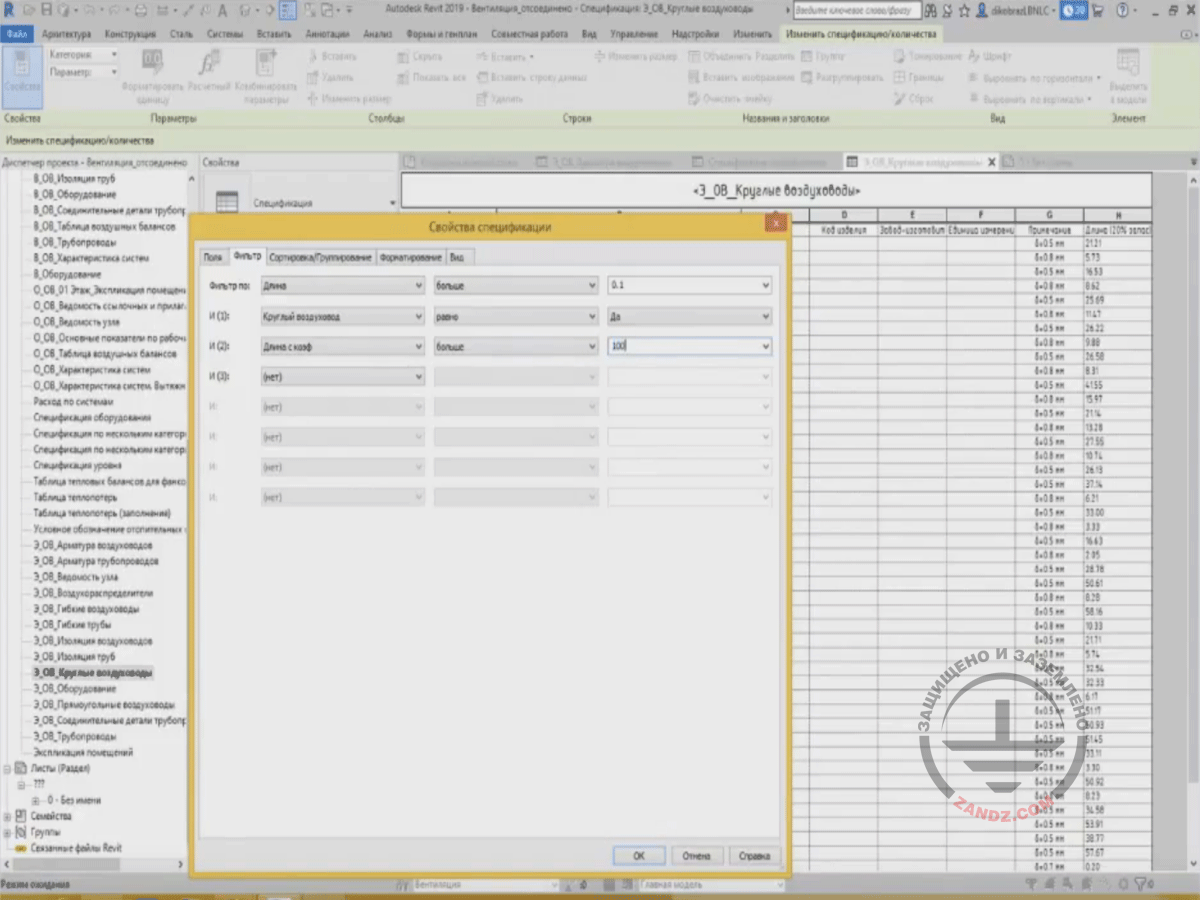
Your question: “How to hide the calculated values equal to zero?” The calculated values that are equal to zero can be hidden using filtering, when you go to the “Filter” tab. Let me show this using the circular air ducts as an example. As you can see, my parameter “Length with a Factor” has appeared in the filter, and I set “more” and “0” or more than 100 mm. Press OK. That's it. The air duct values more than 100 mm are present, while those less than this value have disappeared.
– I am sorry, Stanislav, I will tell our participants about the record one more time. The record will be available within several days. After the webinar, we will publish it on the ZANDZ website, and after that, we will send it to the e-mails of the users that have been registered for the webinar. So, if you have registered for the webinar, you will receive the record and will be able to watch it. Stanislav, your turn.
How to hide the calculated values equal to zero?
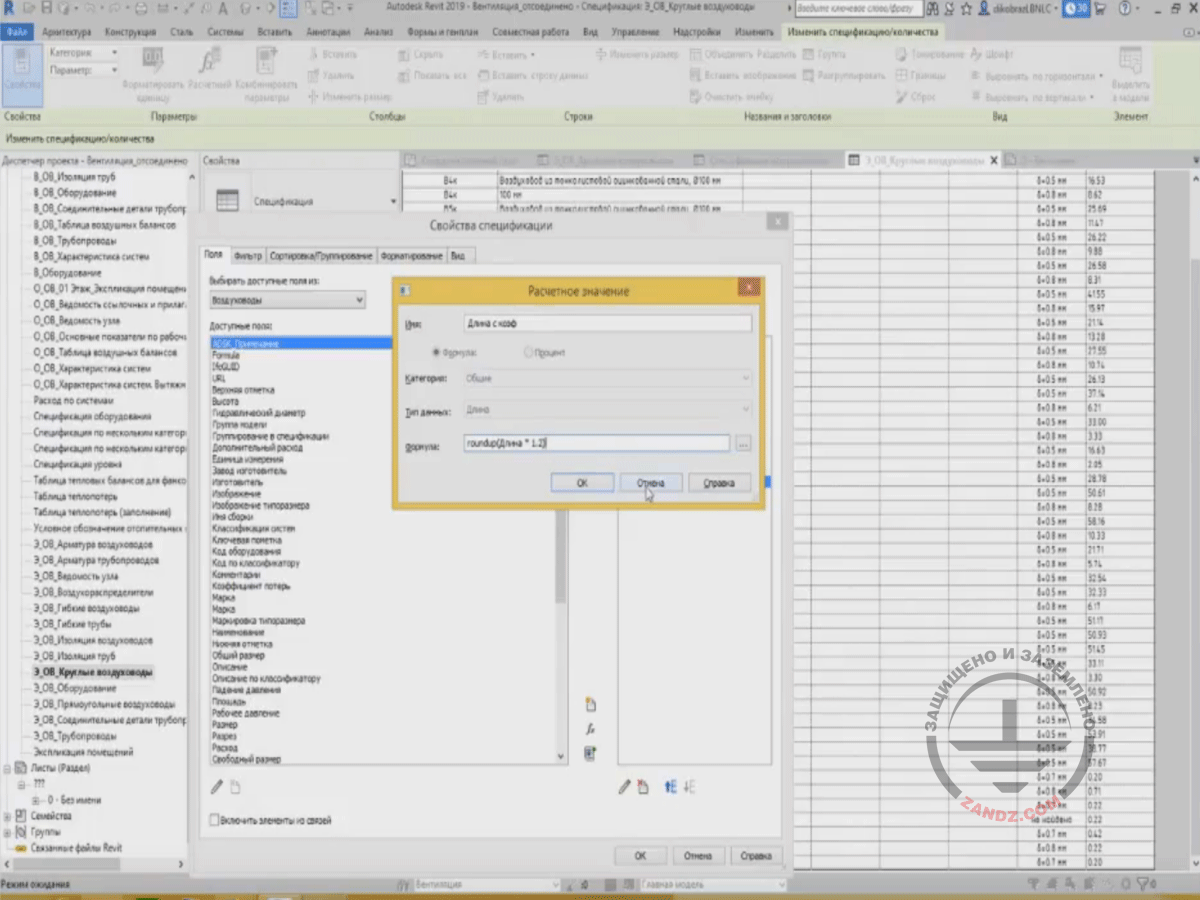
Here is also a question regarding the upward rounding of the values: “Can I set upward rounding for each instance?” Yes, there is such a problem. When I set the field format in “Formatting”, the software rounds the value both upward and downward depending on where it is more suitable. If you only need the upward rounding, then there is an interesting point. You should use the calculated values in this case. In the calculated values in formulas, a particular syntax is used, so the length may be specified using the “roundup” formula, i.e. it will round upward. Such syntax may be see in the Revit Handbook, in the Help section, and you can use this syntax. Thus, “round up” and “round down” means upward or downward rounding, respectively.
Sergey commented: “For example, we create the Bill of Quantities for the cable of one type of sections for different marks. And all calculated results are required, including 0, but you do not need to show them”. If I understood it correctly; of course, I hope I did. Frankly, Sergey, I cannot undestand your question. For the values you do not want to show, use “Filter”. You choose a parameter there, select the filtering criterion, and choose the value. If you do not need zero values, then you set that during filtering, so the zero values are not shown. That's it. I hope I have understood your question correctly and answered it.
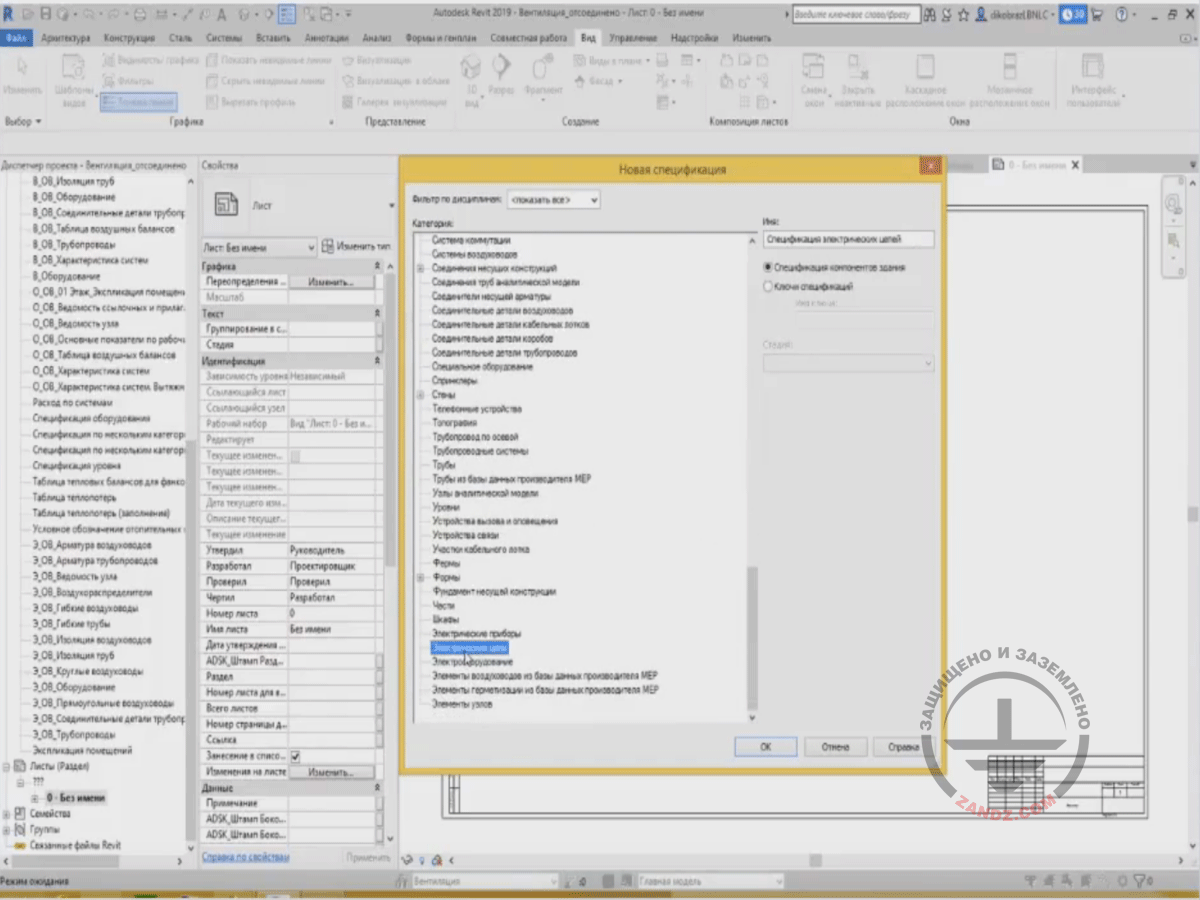
Question: “How to place the specification table on several stylized sheets?” There is also a nuance here. Unfortunately, you cannot quickly divide this Bill of Quantities. Certainly, it would be very convenient. But there is also another option. You need to create two Bills of Quantities if you want to place it on two sheets. Usually, such division is made by floors or some systems. You just set a parameter in “Filter” and partially cut the table; while in the next table, you filter it so that the remaining part of the equipment would be placed in another Bill of Quantities. This is how you should do this using the filters. Unfortunately, there is no quick way to place such a large Bill of Quantity and divide it into several sheets immediately.
Upward rounding
Next question: “If we have elements without families, e.g., wires, how can we calculate them?” The wires are calculated automatically when you create circuits in Revit. For example, you place two pieces of equipment, create a circuit, and add this equipment to the circuit. And the length will be calculated automatically for the circuit. To calculate the cable length, you need to create the Bill of Quantities by category “Electrical Circuits”. And this category will have the “Cable Length” parameter.
The next question: “Can we take together the cables by groups or by panel boards into the specification?” You can do that by panel boards; you only group them by the “Panel Board Name” parameter. I do not have a project for the electrical equipment now; only for ventilation. Unfortunately, there are no such elements. “Can we set the respective attribute on electrical wires with the subsequent filtration in the specification by a user-defined attribute?” Yes, sure. Moreover, you may set your parameter, add a value, and filter by this value. This can be easily done.
How to calculate elements without families?
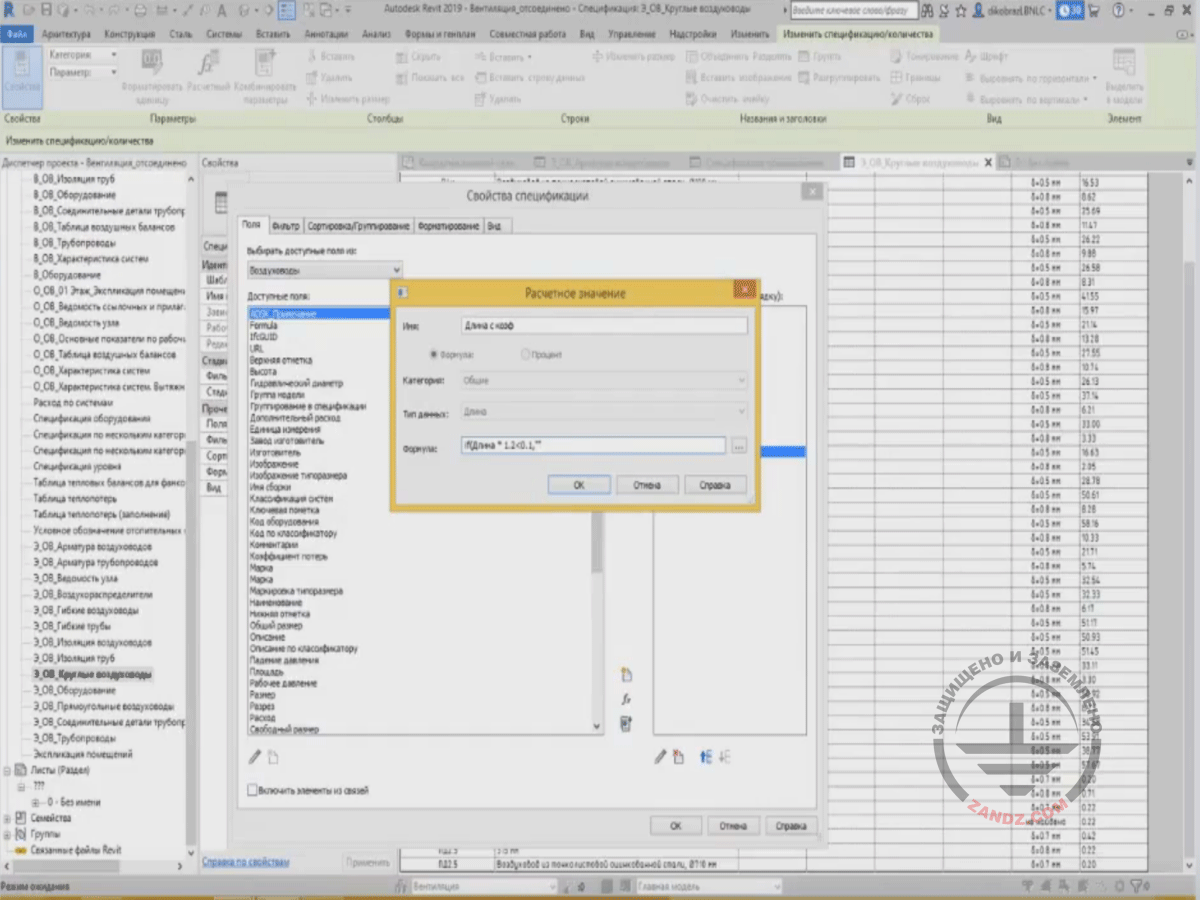
Oh, this is what you were talking about: “Can we show the calculated values equal to zero as empty strings?” You know, it is an interesting question. Probably you can do it like this, but I am not sure that it will work. I have doubts that you can do that using the calculated parameters. For the calculated parameters, you can use this formula, e.g. “if Length*1.2<0.1,””” (add a length), and an empty value will be shown as specified in quotation marks. No, unfortunately, I realized that it would not work for the following reason. It is because the “length” data type is available for the length only, while the empty value is not a parameter of the length type. The empty value is a text parameter; so here, it will not work.
I will tell you a couple of words regarding the next webinars. I have already told during our webinars that you should write your wishes on future subjects or on the changes in any current webinars. We will collect them and consider in the future scheduled webinars. The only thing you should understand is that our current webinar program has already been created. And it will be held, probably with some adjustments, and from the next year on, we will schedule the webinars based on your wishes. Therefore, leave your comments. We will save this information and, based on it, define the subjects for the next webinars.
Question from Dmitry: “Stanislav, is it possible to automatically create the Bill of Quantities of SPTA (spare parts, tools, and accessories) for a particular type of equipment? Can we set/change the list of elements in this Bill of Quantities?” The issue is, as I have already mentioned, that the Bill of Quantities shows only those elements that are present in the project. So, if your equipment has some spare parts, parts and tools, then they also have to be present in the project. They should also be placed. Here, how can I see this? Probably, in your equipment, in the equipment families and generally in the Revit families, you may use the so-called derived families that will also be shown in the Bill of Quantities and Specification. So, you can add some families inside of it in the major equipment and load the project. In addition to the equipment, the elements, which are present in the equipment, will also be included in the Bill of Quantities. I think that such solution may be beneficial.
The next question: “How can we obtain the sum for the pipes of the same diameter but different lengths?” It is easy. You just need to group the pipes by diameter. You can group them by diameter and set the parameter “calculation of length with the totals”.
Another question: “Can we consider different methods of cable laying: on the tray, in the tube, without tubes, and make Revit automatically calculate the lengths?” Probably, you will have to set some certain parameters for each type of laying: on the tray, in the tube, without tubes, etc. Then you just set, e.g., the attribute for a particular method, i.e. that it is in the tray, in the tube, without the tube, etc. And then you filter and calculate the length using a certain method. This is probably it. There are no more new questions.
– Dear colleagues, thank you for your participation and questions. Stanislav, thank you for your presentation. We have finished, and if you have any questions, do not hesitate to send them to info@zandz.com.

Contacts
Контакты
Технический Центр проектирования – ZANDZ.com
Email info@zandz.com
Тел.: +7 (495) 134-33-51
Contacts
Technical Design Center — ZANDZ.com
E-mail info@zandz.com
Tel.: +7 (495) 134-33-51

Thank you for attention!
Спасибо за внимание - Thank you for your attention
<
slides from 17 to 32
Related Articles:
