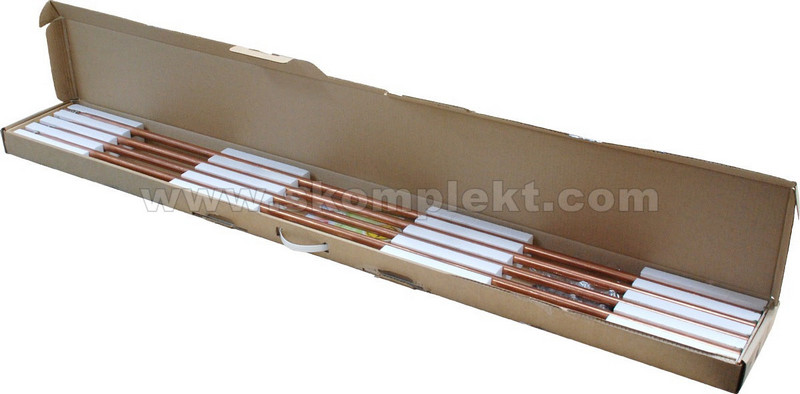
Earlier we told about the main element and advantages of the grounding kit for a single-family house (6 meters) ZANDZ ZZ-6. The kit installation is quite easy, see its description below.
Preparatory work before installation
When placing the ground electrode INSIDE the house, the installation site is being defined considering mechanic protection of the grounding conductor form this electrode to the electric cabinet in the place of laying it, the dryness of the site, convenience of installing pins into the ground. The best place will be a position in the radius of 0,5 meters from the electric shield to achieve the minimal conductor length. Maximal distance from the shield is not limited.
When placing the electrode OUTSIDE the house, one should consider that the ground conductor must be buried 0.5-0.7 meters deep into the channel that was dug in advance. This measure is obligatory and necessary for the protection of the conductor from mechanic damage during exploitation and minimization of weather/season influence, which increases its service life.
The ground electrode is mounted in the same channel. Introduction of the ground conductor through the wall is carried out through the hole or insert prepared beforehand. A steel pipe can act as an insert.
A copper wire/cable with the cross-section of 16 or 25 mm² can be used as a ground conductor. When laying in the ground, a conductor with the minimal cross section of 25 mm² is required, for instance ZZ-500-103, ZZ-500-105 or ZZ-500-110 depending on the distance between the ground electrode and electric shield.
Required tools
- hammer hand tool weighing 300 - 1500 gr: sledgehammer or heavy hammer;
- two wrenches or two pliers (to tighten the clamp bolts).
Ground electrode installation order
- Remove sealing sleeves made of stainless steel from all the pins (fabricated for convenient transportation).
- Put the driving head into the pin hole.
- Drive the pin into the soil, hammering the driving head.
- Remove the driving head and put on a sleeve on the mounted pin (with the wide part down).
- Insert the next pin with its pointed side to the mounted pin with the sleeve on. The junction will be pressed indipendently during installation.
- Repeat steps 1-4 until getting the desired depth of the ground electrode. The sleeve is not put on the last buried pin.
- Fix the clamp to connect the ground conductor, and having connected the conductor, tighten the clamp screws with a maximum force.
The sequence of works during installation of grounding outside the building
- Dig a channel 0.5-0.7 m deep in places where the ground conductor is going to be laid.
- Hold installation of the ground electrode in the prepared channel in accordance with "Ground electrode installation order" given above.
- Lay the ground conductor into the channel.
- Connect the ground electrode with the conductor using the clamp from ZANDZ ZZ-6 kit.
- Connect the ground conductor with the electric shield.
- Fill the channel with ground.
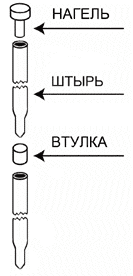
| нагель | driving head |
| штырь | pin |
| втулка | slug |
Single-family house grounding kit ZZ-6 installation example
You can learn more about the kit visiting our page ZZ-6 on our site. You can buy it on the site www.skomplekt.com